Description[]
The Warmaker's Sanctuary is a dungeon that was officially added to the game with Update 36 on June 25, 2019.
A sprawling and ancient fortress, the aptly-named Warmaker's Sanctuary, located inside Klael's Stronghold, is the former sanctum of Warmaker Klael, the last surviving member of the Giant-king Triumvirate. It is home to dangerous creatures, deadly traps, powerful bosses, and an incredible amount of potential treasure for those able or clever enough to brave its depths.
The darkened interiors of the dungeon may require a light source to comfortably navigate, mainly within the trap-laden dungeon section.
Most of the dungeon is populated by Skeletons, Armored Skeletons, Legion Warriors, and Wights.
In the room before the room containing The Archivist's Assistant, three languages can be learned:
Nemedian (TeleportPlayer 162632 -343118 6309)
Vilayet (TeleportPlayer 166295 -347790 6345)
Zhemri (TeleportPlayer 166459 -347742 6343)
In a side area of The Arena, a stele teaches Arena Champion's Armor (TeleportPlayer 145731 -380110 3599).
The stele to the left of the exit in the Champion of the Warmaker’s chamber teaches Godbreaker Armor and Grandmaster Armorsmith (TeleportPlayer 131149 -353346 5773).
The stele to the right of the exit in the Champion of the Warmaker's chamber teaches Warmaker Weapons and Grandmaster Weaponsmith (TeleportPlayer 131149 -351633 5755).
Layout[]
The Gate[]
Upon entering, one will be located atop a large staircase leading down to a long, sandy hallway populated with Skeletons flanking each side. Farther down the main hall is The Gate Guardian boss, a large wight using a two-handed greatsword capable of dealing corruption damage. 'Ware the Traps!, a warning from the thief, Sheva of Koth, can be found in one of the alcoves in the hallway.
The Inner Sanctum[]
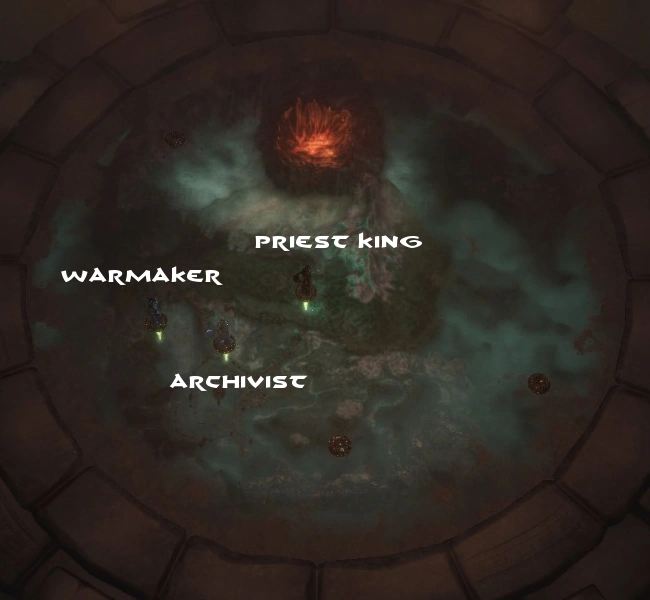
The inner sanctum is a large, rounded room with a map reminiscent of that found near the Archivist. In order to the access the rightmost door to continue, one must solve the map puzzle by acquiring three statuettes of the triumvirate from the three bosses found at this section and inserting them into their respective slots.
The Adventurer's Journal, left in front of the locked door by Biorn The Lucky, hints toward the mechanism needed to unlock the door.
- The Warmaker's Adjutant, an undead giant-king wielding a two-handed greatsword, is found past the green door. It drops the
 Statuette of the Warmaker, which is to be placed in the socket to the furthest left, standing with your back to the door you came through. This location is where the Sanctuary itself is located.
 - The Archivist's Assistant, an undead giant-king wielding a one-handed sword, is found past the red door. It drops the Statuette of the Archivist, which is to be placed in the socket directly above the Unnamed City. This marks where the Archives are located.
- The Servant of the Priest King, an undead giant-king wielding a two-handed pike, is found past the blue door. It drops the Statuette of the Priest King, which is to be placed in the socket to the upper right of the Unnamed City. This marks where the Priest King was slain by Tyros the Deathbringer.
Every correct placement will reward a ![]() Key Fragment, which is then automatically combined into the
Key Fragment, which is then automatically combined into the ![]() Inner Sanctum Key once three statuettes are placed. The fragments are the exact same regardless of which statuette was placed, you just need a total of three fragments. Activating a slot for which you do not have the correct statue will trigger a trap, which then inflicts a short bleed effect. Once the puzzle is solved, the rightmost door of the inner sanctum leading to the dungeons can be unlocked.
Inner Sanctum Key once three statuettes are placed. The fragments are the exact same regardless of which statuette was placed, you just need a total of three fragments. Activating a slot for which you do not have the correct statue will trigger a trap, which then inflicts a short bleed effect. Once the puzzle is solved, the rightmost door of the inner sanctum leading to the dungeons can be unlocked.
The Dungeons[]
Past the dungeon door is a long, semi-collapsed hallway. Two spike traps, one occupied by a human corpse (presumably Biorn The Lucky), are placed to the right and left of the hallway and are poorly illuminated by the nearby brazier. A staircase leading down into the prison itself is the only way to proceed, as one cannot climb over the debris of the collapsed hall.
Descending the staircase leads to a large, open and darkly-lit area with barred rooms located to both the left and right, as well as an intersection leading towards the left. One should exercise extreme caution and slowly progress using a light source, as much of this area is laced with additional spike traps, launching floor tile traps and Exploding and Vapor traps that are easily hidden and hard to discern in the darkness. In addition to this, there are many enemies in the side rooms that can easily catch one out of position and may cause one to unintentionally trigger one of the traps.
On the far end of the room is the gateway to the Arena, which may only be unlocked by acquiring the ![]() Key to the Arena from He-Who-Walks-Below, a large wight using a two-handed greatsword located in the intersecting portion of the dungeons. Once the key is acquired, the Arena gate can be unlocked. However, it is possible to bypass the door by crouching through a large crack in the wall on the left side of the hall.
Key to the Arena from He-Who-Walks-Below, a large wight using a two-handed greatsword located in the intersecting portion of the dungeons. Once the key is acquired, the Arena gate can be unlocked. However, it is possible to bypass the door by crouching through a large crack in the wall on the left side of the hall.
Within the Dungeons are five chests hidden in various rooms that provide the ![]() Rusted Keys necessary to unlock the additional treasure rooms at the end of the dungeon. There are only four optional doors to open, so one of the keys can be skipped.
Rusted Keys necessary to unlock the additional treasure rooms at the end of the dungeon. There are only four optional doors to open, so one of the keys can be skipped.
- The first key is in the first cell on the left after descending the staircase. Use the launching trap inside the cell to reach the upper level. The chest is against the back wall.
- The second key is up the stone stairs in the cell on the right at the intersection. After climbing the stairs, turn around and head into the back room where there are three beds lined up. The chest is next to the third bed.
- The third key is on the left side after the intersection. Use the launching trap by the collapsed bars to reach the upper level. The chest is in the corner on the right.
- The fourth key is up the stairs in the right-side cells down the intersection toward He-Who-Walks-Below. At the top of the stairs, turn around and head around them to find the chest on some shelves between two wooden crates.
- The final key is up the stairs in the cell on the left at the end of the intersection by He-Who-Walks-Below. At the top of the stairs, continue straight forward around a buttress. On the other side, the chest is hidden in a pile of rubble.
The Arena and Ice Halls[]
The Arena is a massive room with a high ceiling that gives way to a raised perimeter of stadium seating. On the far side of the arena from the entrance is a small section populated by a pair of Skeletal Serpentmen, which guard the glowing blue stele that teaches the Arena Champion's Armor (Knowledge).
The lone occupant of the central arena is the Arena Champion, a female human wearing the Arena Champion's Armor but without the helmet. The Arena Champion is extremely powerful and hard to kill, but is entirely optional and can be safely outran if one sprints past her and to the left. Killing her awards 5-8 ![]() Armor Scraps.
Armor Scraps.
Past the arena are the Ice Halls, which are peculiar for the presence of a snowy covering on the floor and numerous nodes of ![]() Black Ice.
Black Ice.
The Ice Halls are noteworthy for their odd assortment of enemies, which include spiders, undead hyenas, undead shalebacks, mammoths, shaleback kings and an undead dragon. Most of these enemies are located within side rooms on the left and right side of the center hall, but will exit their rooms if one ventures too close.
Reaching the first corner of the long hall, one will find a larger room than usual which houses a pair of shaleback kings battling an undead dragon. The undead dragon drops a skeleton key, which can then be used to access a legendary chest in the back of the room beside the brazier. The corner turns toward the left, leading to a final pair of rooms. The room on the left is devoid of enemies, while the room on the right is a large open area with two mammoths protecting a sizable cache of treasure chests.
The path towards the Warmaker's Arena is lined with more black ice nodes and features a Black Yeti behind a breakable ice wall. The Black Yeti will fight the player just the same as any other yeti-type creature, and can be harvested for a Skeleton Key. There are two loot chests behind him contain average Large Chest loot.
Following the path to the end will bring one to the gate of the Champion of the Warmaker, the final boss of the dungeon.
The Champion's Arena[]
The glowing green field immediately past the gateway is a one-way obstacle that prevents one from exiting the arena through the way they came. The arena itself is a large, circular room lined with braziers and six doorways including the entrance. Standing on a semi-raised podium illuminated in the center of the room is the Champion of the Warmaker, an armored giant-like enemy that wields a large mace. The Champion's back is turned towards the entrance of the room, allowing one to ready up for the fight before engaging.
The Champion of the Warmaker deals high damage, attacks in multiple combos and is heavily armored. In addition, the Champion's fight is split into three phases, growing faster, stronger and physically larger at 75% health, then magnified further at 50% health. In addition to this, the arena floor is sparsely laid out with spike traps that can be hard to see as they blend in with the ground and the arena is quite dark.
Despite his intimidating appearance, the Champion of the Warmaker will likely be an easier fight than the Arena Champion. Defeating him will provide 10-15 ![]() Armor Scraps and a chance to also drop either
Armor Scraps and a chance to also drop either ![]() Destroyer or
Destroyer or ![]() Carnage.
Carnage.
At each effective corner of the arena are four doors that are locked and can only be unlocked using four ![]() Rusted Keys hidden within the Dungeon section of the fortress. Each door leads to a small room containing a single chest with high-end treasure and 1-3
Rusted Keys hidden within the Dungeon section of the fortress. Each door leads to a small room containing a single chest with high-end treasure and 1-3 ![]() Armor Scraps.
Armor Scraps.
The exit to the arena is another one-way gateway directly across from the entrance and is flanked by two steles. The green stele to the right of the exit teaches the Warmaker Weapons and Grandmaster Weaponsmith knowledges, while the red stele to the left teaches the Godbreaker Armor and Grandmaster Armorsmith knowledges. Past the exit gate is the other section of the collapsed hall just prior to the dungeons, which acts a shortcut back to the Inner Sanctum and back to the entrance of the dungeon itself.
Notable NPCs[]
- The Gate Guardian -
TeleportPlayer -347251 47789 5690 - Warmaker's Adjutant -
TeleportPlayer -330715 57023 5620 - The Archivist's Assistant -
TeleportPlayer -333319 68819 5612 - Servant of the Priest King -
TeleportPlayer -359637 67723 5607 - He-Who-Walks-Below -
TeleportPlayer -363484 45041 3410 - Arena Champion -
TeleportPlayer -377473 56983 5757 - Champion of the Warmaker -
TeleportPlayer 126542 -352493 5855
Notable creatures[]
- Undead Dragon (Legendary Creature) ("Dracosaurus") -
TeleportPlayer -385411 37976 4878 - Shaleback King -
TeleportPlayer -386607 39196 4980 - Shaleback King -
TeleportPlayer -387314 38679 4980
Notes[]
- There are many ground-based traps.
- Ice and Black Ice can be harvested in some areas.
- Undead Shalebacks and Undead Hyenas guard loot chests.
- Mammoths guard a room with many loot chests.
Gallery[]
Warmaker's Sactuary.

"Warmaker's Sanctuary, built by modder Snowhunter & the Conan Exiles development team."